Start by finding where the water is coming from
Waterproofing fails when the fix does not match the cause. A basement can take on water from five different directions, and each one needs a different repair. Spend an hour on diagnosis before you buy a single tube of sealant.
Walk the basement right after a hard rain, with a flashlight and a dry rag. Note whether the water appears at the floor edge, through the middle of a wall, around a pipe, or from the floor slab itself. Take photos with a tape measure in the frame so you can compare storm to storm.
Water at the wall and floor joint
This is the classic sign of hydrostatic pressure. Groundwater builds up outside the foundation and pushes in at the lowest seam, which is where the wall meets the slab.
Streaks through the wall itself
A single crack with a mineral stain trailing down it points to a failed wall section, a tie hole, or a gutter that dumps water against the house.
Dampness around pipes and windows
Penetrations are weak points. Old utility sleeves and basement window wells fill with water long before the rest of the foundation does.
Moisture with no visible flow
Fine white powder on masonry and a musty smell with no puddle usually mean vapor moving through the wall or slab, not liquid water.
There is a quick test for that last case. Tape a one foot square of plastic sheeting to the wall or floor for two days. Moisture under the plastic means it is coming through the masonry, and moisture on top of the plastic means it is condensation from humid indoor air.
It also helps to know whether your lot sits near a mapped waterway. According to Village Code Chapter 154, Ridgewood adopts the Bergen County flood insurance maps effective August 2019, and those maps are on file with the Village Engineer at 131 N Maple Ave. Knowing where your lot falls tells you whether you have a groundwater problem or a flood problem, and the two need different fixes.
Fix the outside problems first
Most wet basements get better, and some get fully dry, once roof water is moved away from the foundation. This is the cheapest work in the whole process and the step people skip most often. It also protects whatever you install later.
Check these items in order, because each one costs less than the one after it. Most take an afternoon.
- Clean the gutters and make sure every joint and corner is tight, since an overflowing gutter dumps a surprising volume right at the footing.
- Extend downspouts so they discharge well away from the foundation, and use a solid pipe or a splash block that does not slope back toward the house.
- Look at the soil along the foundation. It should fall away from the wall, not hold water against it, and mulch or planting beds should not form a dish.
- Check window wells for debris and standing water. A clogged well drain turns the window into a direct path inside.
- Seal obvious gaps where utilities enter the wall, using a masonry sealant suited to the material.
Do not tie roof downspouts into the sanitary sewer or into a foundation drain that connects to it. That is a common shortcut and a prohibited one in many towns, as the local section below explains.
Interior coatings, patches and what they cannot do
Hardware stores sell masonry waterproofing paints, hydraulic cement and crack injection kits. They have a real place. Hydraulic cement can plug a small active leak, and an epoxy or polyurethane injection can seal a single clean crack.
What they cannot do is stop water pressure. A paint film on the inside face of a wall sits on the wrong side of the problem. When groundwater pushes hard enough, it blisters the coating and finds a new path a few inches over.
Treat coatings as a finishing step for damp walls, not as a cure for water entry. If you see standing water or wet floors after rain, move on to drainage.
Exterior waterproofing or interior drainage
When water is entering under pressure, the two real options are to keep it out at the exterior wall, or to collect it inside and pump it away. Both work. The right choice depends on access, budget, landscaping and how much water you are dealing with.
| Factor | Exterior waterproofing | Interior drainage and sump |
|---|---|---|
| What it does | Keeps water off the foundation wall with a membrane and exterior drain | Collects water at the footing and sends it to a sump pit and pump |
| Digging required | Heavy excavation along the wall | Cutting a channel in the basement floor along the walls |
| Disruption | Yard, plantings, patios and walkways | Interior floor and finished basement areas |
| Ongoing equipment | Usually none besides the drain outlet | Pump, check valve and discharge line that need upkeep |
| Best fit | Open access to the wall and a single trouble side | Water at the floor joint, tight lots, finished yards |
| Power outage risk | Low | Needs a battery backup for storm outages |
On many lots, access settles the question. If a deck, a patio or a neighbor's fence sits along the wall, exterior digging gets complicated fast. Interior drainage is the more common plumber-installed answer for that reason.
Not sure which fix your basement needs?
Describe where and when the water shows up and a plumber can tell you whether drainage, a pump or an outside fix is the right next step.
How an interior drainage system is put together
An interior system has three jobs. It catches water where it enters, carries it to one low point, and moves it out of the house. Each part has to work with the others.
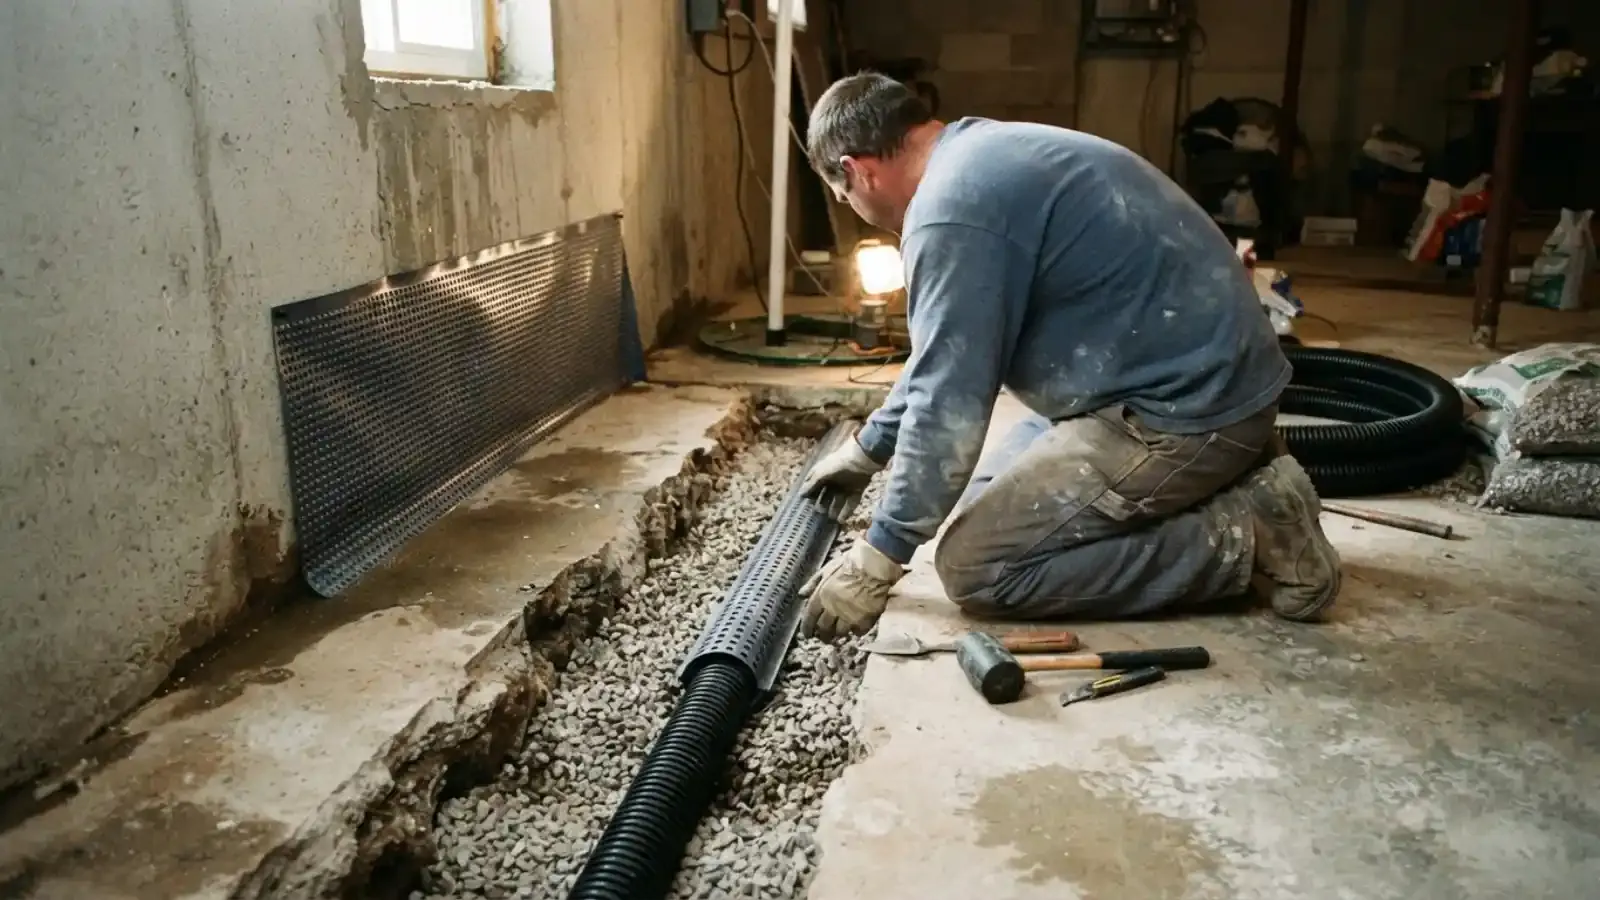
The collection piece is a perforated drain pipe set in a trench along the inside of the footing. Gravel surrounds the pipe so water can reach it easily. The trench is then covered with new concrete, so the floor looks normal when the job is done.
- 1
Open the floor edge
A channel is cut along the problem walls, and the old concrete and fill are removed down to the footing.
- 2
Set the drain pipe
Perforated pipe goes in on a slight slope toward the sump pit, bedded in clean stone and wrapped to keep silt out.
- 3
Install the sump pit
A pit liner is set at the low point so every drain run ends in one place.
- 4
Add the pump and discharge line
The pump, a check valve and a discharge pipe carry water out of the house and away from the foundation.
- 5
Close the floor
New concrete is poured over the trench, and a vapor barrier or wall liner can be added to direct seepage down into the drain.
Choosing and sizing a sump pump
The pump is the part that fails during a storm, so give it attention. A pedestal pump costs less and sits on a tall column, while a submersible pump sits in the pit, runs quieter and handles heavy inflow better. Most waterproofing systems use a submersible.
Look for a cast iron or thermoplastic housing, a float switch that cannot snag on the pit wall, and a check valve on the discharge line. Without the check valve, water in the discharge pipe falls back into the pit every time the pump stops, and the pump short cycles.
A battery backup or a water-powered backup pump matters here. Heavy storms and power outages tend to arrive together, which is exactly when the primary pump is needed most. Our sump pump installation and repair page covers what to expect from a pump that is failing.
Ridgewood rules on sump discharge
Ridgewood's Village Code, Chapter 238, prohibits sending stormwater, groundwater, roof water, pool water or sump water into the sanitary sewer. The sump pump article provides for inspections and a monthly surcharge billed to the property owner until a violation is corrected.
The same chapter says groundwater sumps shall not be connected to a discharge point that feeds the sanitary sewage collection system. When your sump line leaves the house, it needs to go outside to a legal discharge, not into a floor drain or a sewer cleanout.
Source type: Village of Ridgewood municipal code, Chapter 238 (published on ecode360)
Where the discharge line should end up
Plan the outlet before you pick the pump. The line should run outside, exit through the rim joist or wall, and end where the water can soak in or run off without returning to the foundation. A flat yard with poor drainage needs more thought than a lot with natural slope.
Keep the outlet away from a neighbor's property line, a walkway that freezes in winter and the septic or sewer cleanout area. A frozen discharge pipe backs up into the pit and burns out the pump, so use a pipe that sheds water completely and add an outlet that will not freeze shut.
If you are not sure whether an existing basement drain connects to the sewer, have it traced. A camera inspection or a dye test answers the question without guessing. Neighboring towns such as Glen Rock and Midland Park have their own sewer codes, so the same question should be asked there too.
Humidity, dehumidifiers and finishing the space
Even a perfectly sealed basement can feel damp in July because warm air carries moisture and condenses on cool walls. A properly sized dehumidifier with a drain hose to the sump pit or a floor drain keeps humidity under control without constant emptying.
Wait to finish the walls until the basement has stayed dry through at least one season of heavy rain. Use materials that tolerate moisture, such as foam board against the masonry and an air gap behind the drywall, and avoid carpet over bare slab.
When to stop doing it yourself
Gutters, grading and a dehumidifier are fair homeowner work. Cutting the slab, setting a pit, running discharge piping and wiring a pump are not. Mistakes there can undermine a foundation or fail on the first big storm.
Call a plumber if you see water entering at several points, a bowing wall, a horizontal crack, a floor that slopes toward the wall, or any sign of sewage. Those point to bigger structural or drainage problems that deserve a proper assessment. You can read about the full process on our basement waterproofing page, and we serve homes in Wyckoff and nearby towns as well.
What affects the price of waterproofing
Cost factors for a basement waterproofing job
No two basements cost the same, and any firm number given without seeing the space is a guess. These are the factors that move the total up or down.
A written scope listing each of these items lets you compare bids on equal footing.
Ready to talk through your basement?
A plumber can look at the pit, the discharge and the wall conditions and tell you what is worth doing now and what can wait.
Basement waterproofing questions
Often yes. Interior drainage with a sump pump controls water that reaches the footing and floor joint, and it is the usual choice when the outside of the house is hard to dig. It manages water rather than stopping it at the wall, so the pump has to stay in good working order.
Not for water under pressure. Paint can help with light dampness, but liquid water pushing from outside will lift or blister the coating. Fix the source with gutters, grading or drainage, and use paint only as a finish.
The pipe and gravel can last for decades when the drainage path stays clear. The pump is the wear item, and it needs testing every few months, plus a battery backup if power outages are common.
No. Ridgewood's code bars groundwater sumps from discharging to the sanitary sewer, and floor drains in most basements feed that system. Run the discharge pipe outside to a legal outlet, and ask a plumber to confirm where your existing drain goes if you are unsure.
Find out where the water comes from, then fix roof water and grading before spending on interior work. If water is rising near outlets or the electrical panel, do not wade in. Stay out, keep clear of the panel and call for help.